Checklist Plans
Pacing a To-Do List (available for Premium Lite+Pro subscriptions)
Most Pacemaker plans track a number — words, pages, hours. But some work isn't a number; it's a list of things to get done. A Checklist plan lets you take a list of tasks and have Pacemaker pace them across your available days, so you finish everything by your deadline without cramming.
Checklist plans are great for revision passes, research steps, submission prep, chapter-by-chapter edits, or any project that's really a sequence of discrete tasks rather than a word count.
> Checklist plans are a Premium feature (included with both Lite and Pro). On a free account you can view checklists but not add tasks.
Creating a checklist plan
There are three ways to create a checklist.
- In the top navigation, click Create and choose A Checklist
- Go to pacemaker.press/checklists/create/new
- Click Create a Checklist from the navigation panel on the left
The window that opens looks very similar to creating any other plan.
Start in the upper left hand corner and fill in the panels working from top to bottom
Plan Info
This section, located in the upper left hand corner of the screen, covers the basics.
- Name — give your plan a unique name so it's easy to find later.
- Activity — what kind of work is this? Click the dropdown button and choose from selections (e.g. drafting, writing, editing, translating, studying)
- Content — what are you working on? Click the dropdown and pick the one that matches your needs (e.g. novella, novel, essay, script, thesis)
Project Organization (Premium Lite + Pro only) — This section will populate with information once the plan has been saved. See Creating and Managing Projects.
Plan Description (Premium — Lite and Pro only)
This panel is for optional context about your plan. Free users will see it but can't fill it in.
- Make this plan private — when checked, only you can see this plan. Private plans are available to Premium subscribers. Free plans are always public.
- Description — a rich text field, up to 300 words. Use it for notes, a synopsis, context for collaborators, or anything you want to remember about this plan.
Goals
Maximum Daily tasks
What is the maximum number of tasks you’d like to accomplish in a day
Your Start Date
When do you want to begin? Pacemaker starts scheduling from this date.
Fixed deadline?
- Yes (default) — enter a Target Finish Date. Pacemaker fits your target into the days between your start date and that deadline.
- No — instead of a specific end date, tell Pacemaker how much you want to do per day, and it will calculate the finish date for you. Enter your daily amount in the Adjust deadline based on [number] tasks per day field.
Target Finish Date
If you selected that you have a fixed deadline, enter that here. Clicking on the date listed. A calendar will pop-up to select that date you’ve chosen.
Strategy
This is where you choose the shape of your workload — how your targets are distributed across the plan.
- Steadily — the same amount every day
- Rising to the challenge — start small, finish strong
- Biting the bullet — heavy at the start, lighter later
- Mountain Hike (default) — most effort in the middle
- Valley — heavy at the start and end, lighter in the middle
- Oscillating — a mix of heavier and lighter days
- Randomly — every day is a surprise (tap More Random to shuffle further)
Customizations
Here you can fine-tune how Pacemaker handles specific days and periods.
On Weekends?
Tell Pacemaker how to treat Saturdays and Sundays:
- Skip — no work scheduled on weekends
- Do Less — a reduced amount
- The Usual (default) — the same as any other day
- Do More — a heavier load on weekends
- Push! — make weekends your biggest days
Customize Workload on a certain…
Add rules that override the default for specific days or periods:
- Weekday — e.g. schedule less on Mondays (note Saturdays and Sundays are also options)
- Date — e.g. take a specific day off
- Date range — e.g. a vacation or a conference week
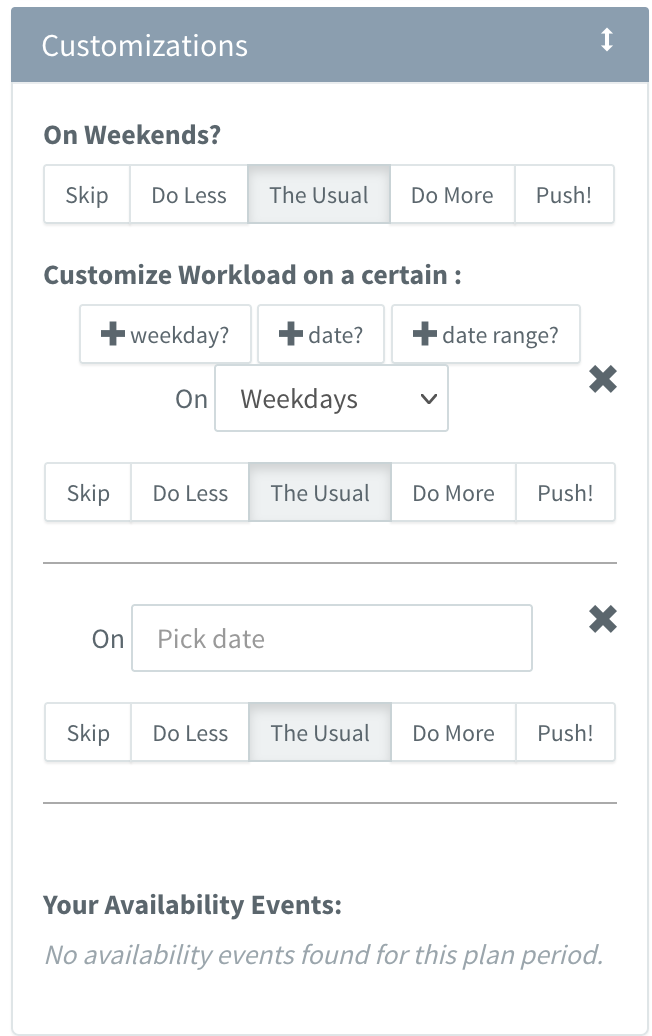
Each rule lets you set the same Skip/Do Less/The Usual/Do More/Push! options for that day or range.
Your Availability Events (Pro only)
If you're on Pro and have set up Availability Events in your account, they'll appear here automatically and be factored into this plan's schedule.
Display (Premium Lite + Pro)
You can customize the color of your calendar. Click the color in the box and a color picker will appear.
What do you need to do?
To the right of the settings panels, in the center of the screen is the checklist editor. The first 5 tasks are additional guidance on creating tasks. Scroll to the bottom to the Add a task box and press Enter. Repeat for each item. A few things to know:
- Each task can be up to 100 characters.
- A checklist can hold up to 31 tasks (enough for a full month). If you need more, create a second checklist.
- Repeat a task: we do not yet have a recurring task feature but you can add the same task title several times at once — handy for repeated steps like "Edit chapter."
Scheduling your tasks
Pacemaker spreads your undated tasks across the days between your start date and deadline. On the schedule you'll see when each task is slated — for example "To do on Fri, Mar 14."
You can also pin a task to a specific day:
- In the task box, click on the date listed and a pop up calendar will appear. Select your chosen date and the task will automatically be updated accordingly
- Reorder tasks by dragging the handle on the left. The order affects how they're paced.
- Remove a task with the remove icon. If you hover over the upper right hand corner of a task, a red x will appear. Click this to delete the task.
Tasks without a due date flow around the ones you've pinned.
Checking off tasks
Tick the checkbox next to a task to mark it done. Pacemaker records the completion date (today by default) and celebrates with an animation. Completed tasks are struck through and show "Completed on [date]."
- Finished a task on a different day? Click the completion date to adjust it — your progress and stats update to match.
- Unticking a task reopens it and clears its completion date.
Your checklist progress feeds into your calendar, streaks, and stats just like numeric progress does — so checking off tasks keeps your pacing on track.
Checklist templates
If you run the same kind of task list often (say, a standard editing pass), save it as a Checklist Template. Choose Create → A Checklist Template, or see Reusable Templates.
Good to know
- Checklist plans count toward your plan limit like any other plan.
- You can archive, delete, and share a checklist plan the same way as a numeric plan. See Archiving and Deleting Plans.
- Switching an existing numeric plan into a checklist (or vice versa) isn't supported — create a new checklist plan instead.